Learn how to use a super-fast M.2 SSD to increase storage speeds and how to
change the boot order in Raspberry Pi OS.
The outcome was a tenfold boost in Storage speed, resulting in overall
speedier performance. Apps load faster, and internet browsing is
dramatically improved. Working with huge, demanding items like video,
enormous photo photos, and big data files is also a breeze with M.2
SATA.
The Raspberry Pi 400 is the company's most recent offering and our favorite
all-in-one computer.
"The microSD card is ejected from the Raspberry Pi 400 here so that the
boot from the USB 3.0 disc is not overridden. You can boot from the M.2
disc with the microSD card installed by changing the default boot
order."
"The M.2 drive is housed inside this enclosure and is linked directly
to the Raspberry Pi 400's blue USB 3.0 connector."
As a result, we set out to find a Raspberry Pi 400 compatible solution. It
turns out that upgrading a Raspberry Pi 400, in the same way, is simply
because of the USB 3.0 ports on the back and recent default support for USB
boot.
All you need is an M.2 SATA disc and an M.2 SATA to USB 3.0 enclosure that
is compatible. Connect the two and connect the device to the Raspberry Pi
400, then copy the operating system across and you're ready to start.
01 put together the drive
We begin by putting together the M.2 drive enclosure. The TSCM42S M.2 SATA
to USB 3.1 SSD Enclosure Kit includes a SATA III to USB board on which the
M.2 SSD is attached. Insert the SATA III interface and carefully put the M.2
SSD into the socket. The M.2 SSD is then secured in place with a single
screw. We utilize the enclosure to confine the M.2 SSD drive once it is
attached to the board. Depending on whatever M.2 drive and enclosure you
pick, the assembly method will vary, but most will follow a similar
pattern.
02 Configure the drive
If you wish to install a fresh copy of the Raspberry Pi OS on the M.2 SSD
drive, utilize Raspberry Pi Imager (magpi.cc/imager) to do so. This may be
done on any computer, even a Raspberry Pi that is powered by a microSD card.
After installing your fresh installation, see the 'Using Imager' box
(overleaf) and proceed to Step 4.
Another alternative is to boot from the microSD card and clone the current
operating system to the M.2 SSD disc. Make sure your MicroSD card is running
the most recent version of Raspberry Pi OS before booting Raspberry Pi 400
from the microSD card.
sudo apt update
sudo apt full-upgrade
03 Make a copy of the drive
Connect one of the two blue USB 3.0 ports to the M.2 drive. Select
Accessories and SD Card Copier from the Raspberry Pi menu. In Copy from
Device, choose the microSD card; ours is labeled 'SC16G (/dev/mmcblk0)'.
Select the M.2 drive in Copy to Device. It should be mounted on /dev/sda
because that is the only other choice.
Make sure that New Partition UUIDs are checked (this will enable you to
mount and access both devices at the same time). To begin the copying
operation, choose Start and Yes from the 'delete all content' warning
box.
04 Switch to M.2 mode
You may use the M.2 drive to boot and run your Raspberry Pi 400 after SD
Card Copier has completed replicating the contents of the microSD card to
it. Shut down your Raspberry Pi (from the Raspberry Pi apps menu, choose
Shutdown> Shutdown). Remove the microSD card from the Raspberry Pi since
it takes precedence over the external M.2 disc when it comes to booting. To
restart Raspberry Pi 400, press the FN and Power (F10) keys together. The
M.2 drive will be used to boot and run the program.
When you use the M.2 drive instead of the microSD card, you should notice a
performance boost.
05 GNOME Disks Installation
When you use the M.2 drive instead of the microSD card, you should notice
a performance boost. It will be significantly faster to open apps and
browse the internet. GNOME Disks may be used to test the M.2 drive and
obtain extensive information about its performance. Install it with the
help of a Terminal window.
sudo apt install gnome-disk-utility
To access GNOME Disks, go to the Raspberry Pi apps menu and select
Accessories > Disks.
Using Rpi-Imager
If you'd rather start from scratch with the Raspberry Pi OS, you may use
Raspberry Pi Imager instead of an SD Card Copier. This software will
download the most recent version of Raspberry Pi OS, format your hard
disc, and install the operating system on your Raspberry Pi (all at the
click of a button). Install Raspberry Pi Imager with Terminal after
booting up Raspberry Pi OS with the microSD card.
sudo apt install rpi-imager
To run the software, go to the Raspberry Pi apps menu > Accessories
> Imager.
Select 'Raspberry Pi OS (32-bit)' from the 'Choose OS' menu.
Next, pick your external M.2 drive from the SD Card menu by clicking on
'Choose SD Card'.
To download the operating system and write a fresh installation to the M.2
disc, select 'Write'.
06 Drive a speedometer
Select the rootfs partition and choose Benchmark Partition from the
'Additional partition options' icon (shaped like two cogs).
To test the drive, click Start Benchmark and Start Benchmarking. The
average read rate is 382.4 megabytes per second (much faster than our
microSD card). To do a comparison test, insert the microSD card and choose
it in GNOME Disks. In comparison, we only receive 44.9MB/s.
Swap boot orders in 07
The Raspberry Pi 400 may now be used with the M.2 drive connected and
the microSD card removed (as it will boot from the M.2 drive). When you
insert a microSD card, the Raspberry Pi 400's EEPROM (electrically
erasable programmable read-only memory) prioritizes the microSD card
above USB. The option to prioritize USB boot over microSD boot is now
just a few clicks away, thanks to a recent update to
raspi-config. Enter the following commands in Terminal.
Select Advanced Options and Boot Order using the arrow keys, then 'B2
USB Boot'. 'USB is the default boot device,' says the screen. Choose
Finish and then Yes to 'Would you prefer to reboot now?' by pressing
ENTER.
When the Raspberry Pi reboots, it will boot from the M.2 SDD that is
attached to the USB port (even if the microSD card is inserted). The M.2
SSD drive may now be used as the default on your Raspberry Pi 400.
Swap boot orders in 07
In raspi-config, you may now choose to prioritise USB over microSD.
You'll want to alter the EEPROM settings if you want to examine what's
going on beneath the hood (or customise your own boot mode).
The current EEPROM setup may be viewed here:
This works in the same way as the config.txt file. The final choice
will be
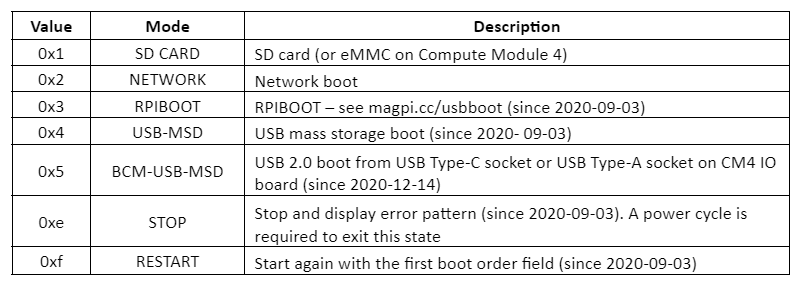
BOOT_ORDER=0xf41
The command '0xf41' indicates to attempt the SD card first, then USB
mass storage, and finally restart. After '0x,' the values are read from
right to left.
A new pair of boots has been ordered.
The BOOT ORDER variable should be changed to '0xf14'. If neither is
identified, this will boot from the USB device '4', then the microSD
card '1', followed by a restart 'f'. Enter the following in Terminal to
open the boot.conf file in your text editor (the default is Nano, which
we're using here) and change it to apply the adjustments to the newest
EEPROM release.
sudo -E rpi-eeprom-config --edit
Change ‘BOOT_ORDER=0xf41’ to:
BOOT_ORDER=0xf14
To write the file and exit Nano, use CTRL+O and then CTRL+X. (or save
and quit in your preferred text editor). 'EEPROM update waiting' will be
shown on the terminal. To apply the update, please restart your
computer.' To apply the update, restart your Raspberry Pi.
BOOT_ORDER fields
The BOOT ORDER attribute specifies the order in which the various boot
modes are activated. It is read from right to left and can have up to
eight digits. '0xf41' is the default setting. This setting is SD CARD,
USB-MSD, then RESTART, read from right to left.


0 Comments